Create Account
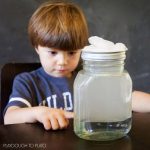
Have you ever looked up at the sky and wondered how clouds form? Although clouds may look like fluffy cotton floating high above the ground, they are actually made of countless tiny water droplets or ice crystals suspended in the atmosphere.
The amazing part is that you can explore one of the processes behind cloud formation using a few everyday materials.
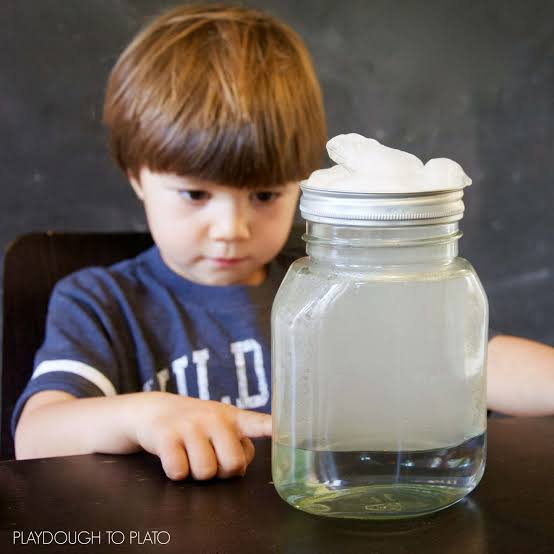
A cloud-in-a-jar experiment lets children observe how cooling air and condensation contribute to the formation of visible droplets. It is an excellent introduction to atmospheric science because it turns an invisible process into something young scientists can investigate.
With adult supervision, a clear jar, warm water, ice, and a few minutes of observation, children can begin exploring the same basic physical process involved in the formation of many real-world clouds.
The experiment also encourages curiosity. Why does water appear on a cold surface? What happens when warm, moist air cools? Why do clouds form in the sky but not always inside a room?
Let’s investigate!
Name the Task: Cloud in a Jar
Science topic: Weather, condensation, water vapor, and the water cycle
Recommended age: Approximately 6–14 years, with an adult adjusting the instructions to the child’s age and abilities.
Estimated time: 10–15 minutes
Difficulty: Beginner-friendly
What You Will Learn
By completing this activity, young scientists will explore:
- The difference between liquid water and water vapor.
- How condensation turns water vapor into tiny liquid droplets.
- Why cooling moist air can encourage cloud formation.
- How clouds are connected to Earth’s water cycle.
- How scientists make observations, ask questions, and test explanations.
List of Benefits
This experiment supports scientific thinking by encouraging children to observe changes, identify patterns, make predictions, and explain what they see.
It also introduces important STEM skills, including:
- Observation: Looking closely at changes inside the jar.
- Prediction: Guessing what might happen before starting.
- Cause and effect: Connecting cooling with condensation.
- Scientific communication: Describing observations in their own words.
- Critical thinking: Comparing the experiment with real clouds and recognizing the limitations of a model.
Materials You Will Need
Gather these household materials before beginning:
- One clean, clear glass jar with a wide opening.
- A small amount of warm water.
- Several ice cubes.
- A small metal or ceramic plate that can safely rest over the jar opening.
- A dry towel for handling condensation and cleaning spills.
- A notebook and pencil for recording observations.
Optional extension: A small flashlight can help children observe changes in the jar more clearly. Use it outside the jar and never shine it into anyone’s eyes.
This version demonstrates condensation on a cooled surface. A visible cloud may not form throughout the jar, and that is an important scientific observation rather than a failed experiment.
Safety First: Adult Supervision Is Essential
An adult must supervise the entire experiment.
- Use warm, not boiling, water. An adult should prepare and pour the water.
- Place the jar on a stable, heat-resistant surface.
- Use a jar that is clean and free from cracks or chips.
- Do not use a sealed jar. The jar must remain unsealed throughout the activity.
- An adult should handle the plate and ice if the setup is difficult for the child.
- Keep the experiment away from electrical equipment and clean up spilled water promptly.
- Do not drink the experiment water or taste any materials.
- Stop if the jar becomes uncomfortable to handle or shows signs of damage.
Warm water is sufficient for this demonstration. There is no need to use boiling water, aerosol sprays, matches, or other potentially hazardous materials.
Goals of the Experiment
The main goal is to help children understand that water can change from one physical state to another.
The experiment focuses on three related ideas:
- Warm water releases water vapor into the air above it.
- When moist air encounters a sufficiently cool surface, some water vapor can condense into liquid droplets.
- Clouds in the atmosphere form when moist air cools enough for water vapor to condense onto tiny particles in the air, such as dust or sea salt.
The jar is a simplified model. It demonstrates condensation, but it does not reproduce every condition involved in forming a natural cloud.
Steps: How to Make Your Cloud in a Jar
Step 1: Add Warm Water to the Jar
Ask an adult to pour a small amount of warm water into the bottom of the clear jar, just enough to cover the base.
Let the water settle for a moment while the child observes the inside of the jar.
What to observe: The water is visible as a liquid, but some water molecules are also escaping from its surface into the air.
The science behind it: Water molecules are constantly moving. Some molecules at the surface gain enough energy to enter the air as water vapor, a process called evaporation.
Water vapor itself is invisible. The mist or droplets sometimes seen above warm water are liquid droplets that have formed after vapor cools and condenses.
Ask the young scientist: If water vapor is invisible, how do you think we can tell that water is moving into the air?
Step 2: Prepare the Cold Surface
Have an adult place several ice cubes on a small plate that can safely rest over the jar’s opening. Position the plate so the cold underside faces the air inside the jar.
Keep the jar unsealed.
What to observe: The ice cools the plate, making its underside colder than the moist air inside the jar.
The science behind it: Heat naturally moves from warmer objects toward cooler objects. As the cold plate exchanges heat with the air beneath it, the nearby air cools.
If that air cools enough, it may reach its dew point—the temperature at which it becomes saturated with water vapor under the current conditions.
At or below the dew point, water vapor can condense into liquid droplets when suitable surfaces or particles are available.
Step 3: Watch for Tiny Droplets
Wait for several minutes and observe the inside of the jar, especially the area near the cold plate.
You may notice tiny droplets forming on the underside of the plate or on the inside walls of the jar.
What to observe: Look for small beads of water, a cloudy appearance, or a thin layer of condensation.
The science behind it: As moist air cools near the cold surface, some water vapor changes into liquid water. This process is called condensation.
The droplets are made of water molecules that were previously present in the air as invisible vapor.
If you do not see a cloud-like mist, do not worry. The amount of water vapor, the temperature difference, the available surfaces, and the surrounding conditions all affect what becomes visible.
In this simple setup, condensation on the cold surface is often easier to observe than a suspended cloud.
Step 4: Record Your Observations
Invite the child to draw the jar and label what they see.
They might record:
- Where droplets appeared.
- Whether the jar looked clear or cloudy.
- How long it took for visible changes to occur.
- Whether the droplets appeared near the cold plate.
- What changed after the experiment was left for a few more minutes.
The science behind it: Scientists use observations to build explanations about the natural world. Recording what actually happened helps distinguish evidence from guesses.
If the expected droplets did not appear, record that result too. Scientists learn by identifying which conditions may need to change in a future test.
Step 5: Connect the Jar to Real Clouds
Once the experiment is finished, ask the child to imagine the jar as a tiny model of part of Earth’s atmosphere.
Explain that the Sun warms Earth’s surface, which transfers energy to the air and water. Water evaporates from oceans, lakes, rivers, soil, and plants. Moist air can rise and expand as atmospheric pressure decreases, causing it to cool.
When the air cools to its dew point, water vapor can condense onto tiny airborne particles and form cloud droplets. Under suitable conditions, these droplets or ice crystals grow and may eventually contribute to precipitation.
The science behind it: Real cloud formation involves several interacting processes, including evaporation, air movement, cooling, condensation, and the presence of condensation nuclei.
The jar demonstrates one important part of this process, but it does not reproduce the full movement and pressure changes of the atmosphere.
Why Does Condensation Happen?
Condensation is the change of water from a gas into a liquid.
It occurs when water vapor loses energy and molecules become more likely to remain together in the liquid state. In everyday life, condensation explains why a cold drinking glass develops water droplets on its outside, why bathroom mirrors become foggy after a warm shower, and why droplets may form on windows during cool weather.
Cloud formation follows a related principle, although the droplets form within the atmosphere rather than simply collecting on a cold surface.
When moist air cools to its dew point, water vapor can condense onto tiny particles suspended in the air. The resulting droplets are small enough to remain suspended under suitable atmospheric conditions.
Clouds can also contain ice crystals, particularly at temperatures below freezing.
This is why clouds are not simply water vapor made visible. Water vapor is invisible; the visible portions of most clouds consist of liquid droplets, ice crystals, or a combination of both.
Try a Scientific Challenge: Change One Variable
After the first demonstration, young scientists can investigate how different conditions affect condensation.
Keep the same safety rules and change only one variable at a time. This makes it easier to identify what may have caused a difference.
Challenge A: Compare different cooling times
Observe the jar after one minute, three minutes, and five minutes. Record whether the amount or location of visible condensation changes.
Challenge B: Compare warm and room-temperature water
With adult help, repeat the activity using room-temperature water in a clean jar. Keep the ice and observation time similar.
Ask whether the amount of visible condensation changes. Explain that the starting temperature can influence evaporation and the amount of water vapor available, so the result may vary.
Challenge C: Compare different cold surfaces
If available, an adult can prepare two otherwise similar setups using different safe, cold surfaces. Observe whether condensation appears in different places or at different times.
Do not assume that one setup will always produce a better result. Surface temperature, moisture, and the materials used can affect the outcome.
For each challenge, record the question, prediction, changed variable, observations, and conclusion.
Questions for Young Scientists
Use these questions to turn the activity into a short science discussion.
1. Can we see water vapor?
No. Water vapor is invisible. The white mist often called steam is made of tiny liquid droplets that form when vapor cools.
2. Why did the cold plate matter?
It cooled the moist air nearby. If the air reached its dew point, water vapor could condense into liquid droplets.
3. Are clouds made of invisible gas?
No. Although clouds form from water vapor, the visible cloud consists mainly of tiny liquid water droplets, ice crystals, or both.
4. Does every cloud produce rain?
No. Many clouds do not produce precipitation that reaches the ground. Droplets or ice crystals must grow sufficiently and the atmospheric conditions must allow precipitation to develop and fall.
5. Is a cloud in a jar exactly like a real cloud?
No. The jar is a simplified model that helps demonstrate condensation. Real clouds develop through complex atmospheric processes involving cooling, pressure, rising air, and microscopic particles.
What This Experiment Teaches Us About the Water Cycle
The water cycle describes how water moves between Earth’s surface, oceans, atmosphere, and land.
Evaporation transfers liquid water into water vapor. Plants also release water vapor through transpiration. Moist air moves through the atmosphere, and cooling can cause condensation that forms clouds.
Under suitable conditions, water returns to the surface as rain, snow, or other forms of precipitation. It may then flow into rivers, enter lakes and oceans, soak into the ground, or evaporate again.
The cloud-in-a-jar activity introduces the transition from invisible water vapor to visible droplets. Although it cannot recreate the entire water cycle, it gives children a starting point for understanding how changes in temperature affect water in the environment.
This knowledge connects a small kitchen-table experiment to weather forecasting, climate science, agriculture, and the study of Earth’s atmosphere.
Final Takeaway: Small Experiments Can Explain Big Ideas
A simple jar, warm water, and ice can introduce one of the most important processes in atmospheric science: condensation.
By observing changes, recording evidence, and asking questions, young scientists learn that weather is not magic. It follows physical processes that researchers can investigate and explain.
The experiment also demonstrates an essential scientific lesson: results do not always look exactly as expected. If the jar develops droplets rather than a visible cloud, there is still something valuable to observe and explain.
With adult supervision and safe handling of warm water, this activity offers an accessible way to explore water vapor, condensation, and cloud formation at home or in a classroom.
The next time a child looks up at a cloudy sky, they may see more than a collection of white shapes. They may begin to recognize the movement of water, the effects of temperature, and the science happening all around them.
References
- NASA Space Place — Water Cycle: https://spaceplace.nasa.gov/water-cycle/en/
- NASA — The Water Cycle: https://science.nasa.gov/earth/earth-observatory/the-water-cycle/
- National Oceanic and Atmospheric Administration (NOAA) — How Clouds Form: https://www.noaa.gov/jetstream/clouds/how-clouds-form
- National Weather Service — Cloud Classification and Meteorology Resources: https://www.weather.gov/jetstream/
- UCAR Center for Science Education — Clouds and the Water Cycle: https://scied.ucar.edu/learning-zone/clouds